Pages

Sunday, 23 June 2024

Creating a Fractal Art Application: Drawing the Sierpinski Triangle

 By PETER ASCHBACHER, PA-Soft e.U.

June 2024

Introduction

Welcome to this exciting tutorial, where we'll create a fractal art application using Delphi. We'll focus on the fascinating Sierpinski Triangle, a self-similar fractal that is relatively easy to construct but offers a visually appealing result. This demo app allows users to adjust colors and recursion depth, save artwork, and more. Let’s dive in!


What You'll Learn

  • Drawing the Sierpinski Triangle using recursion
  • Managing form painting and resizing in Delphi
  • Implementing user controls for customization
  • Saving drawings as PNG files
        

The Sierpinski Triangle

Prepare to be captivated by the Sierpinski Triangle, a fractal named after the Polish mathematician Wacław Sierpiński. This intriguing pattern is formed by recursively subdividing an equilateral triangle into smaller equilateral triangles. Despite its simplicity, the Sierpinski Triangle reveals an intricate and beautiful pattern that will surely pique your curiosity.

Source Code

This project uses no third-party components and can be compiled in Delphi using just the standard RTL components!

Update on Monday 2024-06-24:

Update the StatusBar directly in the UpdateBuffer procedure with the current image dimensions and the current recursion depth:

// UpdateBuffer resizes the buffer bitmap, fills it with the background color, and draws the Sierpinski Triangle.

procedure TForm1.UpdateBuffer;

begin

  if Assigned(FBuffer) then // Avoid Access Violation at program close

  begin

    FBuffer.Width := ClientWidth; // Set buffer width to form's client width

    FBuffer.Height := ClientHeight; // Set buffer height to form's client height

    FBuffer.Canvas.Brush.Color := FBackgroundColor; // Set buffer canvas brush color to the background color

    FBuffer.Canvas.FillRect(ClientRect); // Fill the entire buffer with the background color

    // Draw the Sierpinski Triangle on the buffer canvas using the foreground color

    FBuffer.Canvas.Brush.Color := FForegroundColor;

    FBuffer.Canvas.Pen.Color := FForegroundColor;

    DrawSierpinskiTriangle(FBuffer.Canvas, 10, FDrawHeight - 10, ClientWidth - 10, FDrawHeight - 10, ClientWidth div 2, 10, FRecursionDepth);

  end;

  Invalidate; // Invalidate the form to trigger a repaint

  // Update the StatusBar:

  StatusBar1.SimpleText :=

      IntToStr(FBuffer.Width) + ' x ' + IntToStr(FBuffer.Height) + // show dimensions

      ' | Recursion Depth: ' + IntToStr(FRecursionDepth);          // show recursion depth
end;

This is the central code:

// DrawSierpinskiTriangle recursively draws a Sierpinski Triangle on the given canvas.

procedure TForm1.DrawSierpinskiTriangle(Canvas: TCanvas; x1, y1, x2, y2, x3, y3: Integer; Depth: Integer);

var

  mx1, my1, mx2, my2, mx3, my3: Integer;

begin

  if Depth = 0 then

  begin

    // Draw the triangle using the given vertices

    Canvas.Polygon([Point(x1, y1), Point(x2, y2), Point(x3, y3)]);

  end

  else

  begin

    // Calculate the midpoints of each side of the triangle

    mx1 := (x1 + x2) div 2;

    my1 := (y1 + y2) div 2;

    mx2 := (x2 + x3) div 2;

    my2 := (y2 + y3) div 2;

    mx3 := (x3 + x1) div 2;

    my3 := (y3 + y1) div 2;


    // Recursively draw three smaller triangles

    DrawSierpinskiTriangle(Canvas, x1, y1, mx1, my1, mx3, my3, Depth - 1);

    DrawSierpinskiTriangle(Canvas, mx1, my1, x2, y2, mx2, my2, Depth - 1);

    DrawSierpinskiTriangle(Canvas, mx3, my3, mx2, my2, x3, y3, Depth - 1);

  end;

end;


The Sierpinski Triangle is drawn recursively on a separate  Bitmap in memory to speed up the drawing.

You can download the whole project source code, including a compiled signed executable.

Key Features of the Application

  1. Drawing the Sierpinski Triangle:

    • The DrawSierpinskiTriangle procedure recursively draws the Sierpinski Triangle on the canvas.
    • The UpdateBuffer procedure resizes and redraws the triangle whenever the form is resized or the colors are changed:

// UpdateBuffer resizes the buffer bitmap, fills it with the background color, and draws the Sierpinski Triangle.

procedure TForm1.UpdateBuffer;

begin

  if Assigned(FBuffer) then // Avoid Access Violation at program close

  begin

    FBuffer.Width := ClientWidth; // Set buffer width to form's client width

    FBuffer.Height := ClientHeight; // Set buffer height to form's client height

    FBuffer.Canvas.Brush.Color := FBackgroundColor; // Set buffer canvas brush color to the background color

    FBuffer.Canvas.FillRect(ClientRect); // Fill the entire buffer with the background color

    // Draw the Sierpinski Triangle on the buffer canvas using the foreground color

    FBuffer.Canvas.Brush.Color := FForegroundColor;

    FBuffer.Canvas.Pen.Color := FForegroundColor;

    DrawSierpinskiTriangle(FBuffer.Canvas, 10, FDrawHeight - 10, ClientWidth - 10, FDrawHeight - 10, ClientWidth div 2, 10, FRecursionDepth);

  end;

  Invalidate; // Invalidate the form to trigger a repaint
end;


2. Customizable Colors:

    • Users can change the background and foreground colors through the menu items mBackgroundColor and mForegroundColor:


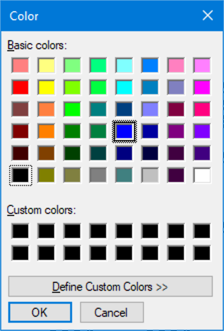
    • The ColorDialog component allows users to pick colors visually:


3. Adjustable Recursion Depth:

    • The recursion depth for drawing the triangle can be set through the menu item mRecursivityDepth:


    • An InputQuery dialog is used to prompt the user for a new recursion depth, with input validation to ensure the depth is between 1 and 8:



4. Saving the Artwork:

    • The drawing can be saved as a PNG file using the mSave menu item:


    • The SaveToPNG procedure handles the saving process, converting the buffer bitmap to a PNG image:

      // SaveToPNG saves the buffer bitmap to a PNG file.

      procedure TForm1.SaveToPNG(const FileName: string);

      var

        PNG: TPngImage;

      begin

        PNG := TPngImage.Create;

        try

          PNG.Assign(FBuffer);

          PNG.SaveToFile(FileName);

        finally

          PNG.Free;

        end;

      end;

Conclusion

This demo application showcases the power of recursion and the beauty of fractal art through the Sierpinski Triangle. By integrating user controls for color customization and recursion depth, the app offers a flexible and interactive experience. Additionally, the ability to save the artwork as a PNG file makes it easy to share your creations.

Feel free to explore and expand this application further. Happy coding!

About the Author

Peter Aschbacher is the founder of PA-Soft e.U. and an experienced Delphi developer. He is passionate about creating innovative software solutions and sharing his knowledge with the community.

For more information, visit PA-Soft e.U. or contact Peter at peter.aschbacher@pa-soft.com.

Sunday, 9 June 2024

Understanding the Difference Between Luminance and Lightness

 When working with digital images, color theory, or even photography, terms like "luminance" and "lightness" frequently arise. Although they might sound similar and are related to the perception of brightness, they refer to different concepts. Understanding the difference between luminance and lightness is essential for anyone involved in fields that require color manipulation or analysis. This blog post will explore these two terms, their definitions, how they are calculated in Delphi, and their applications.

What is Luminance?

Luminance refers to the intensity of light emitted from a surface per unit area in a given direction. It is a photometric measure that represents how bright a color appears to the human eye, considering the varying sensitivity of our eyes to different wavelengths of light. Luminance is denoted by the symbol YY and is measured in candelas per square meter (cd/m²).

Calculation of Luminance

Luminance is calculated using a weighted sum of the red, green, and blue (RGB) components of a color. The formula used for this calculation is derived from the ITU-R BT.601 standard, which approximates the human eye's sensitivity to these colors:

 Y = 0.299 X R + 0.587 × G + 0.114 × B


Here, R, G, and B are the red, green, and blue color components, respectively.


Application of Luminance

Luminance is crucial in various applications, including:

  1. Television and Video: Ensuring the brightness of images is consistent across different devices.
  2. Photography: Adjusting exposure and understanding the brightness of different parts of an image.
  3. Computer Graphics: Simulating realistic lighting and shading effects.

What is Lightness?

Lightness is a perceptual measure that describes how light or dark a color appears relative to a white or black reference. It is part of color spaces designed to be more aligned with human vision, such as HSL (Hue, Saturation, Lightness) and LAB (Lightness, A, B).

Calculation of Lightness

In the HSL color model, lightness is calculated as the average of the maximum and minimum values of the RGB components:

In the LAB color space, lightness (L) is derived through more complex transformations of the RGB values to approximate human vision more closely.

Application of Lightness

Lightness is used in contexts where an intuitive understanding of color is necessary:

  1. Graphic Design: Adjusting colors to achieve the desired visual effect.
  2. Image Editing: Modifying the lightness of colors to enhance or alter images.
  3. Color Theory: Teaching and understanding how colors relate to perceived brightness.

Key Differences Between Luminance and Lightness

Basis of Measurement

  • Luminance: Based on the physical intensity of light, considering the human eye's varying sensitivity to different wavelengths.
  • Lightness: A perceptual measure based on how light or dark a color appears compared to white or black.

Calculation Method

  • Luminance: Calculated using a weighted sum of RGB components with specific coefficients.
  • Lightness: In HSL, calculated as the average of the maximum and minimum RGB values; in LAB, through complex transformations.

Applications

  • Luminance: Used in technical fields such as television, photography, and computer graphics.
  • Lightness: Used in design, image editing, and color theory for more intuitive color adjustments.

Conclusion

While luminance and lightness are related to the perception of brightness, they serve different purposes and are calculated differently. Luminance is a more technical measure aligned with the physical properties of light and human vision sensitivity, whereas lightness is a perceptual measure useful in design and editing contexts. Understanding these differences allows for more precise and effective manipulation of color in various applications. Whether you're adjusting the exposure in a photograph, designing a visually appealing graphic, or simulating realistic lighting in a video game, knowing when to consider luminance versus lightness is key to achieving your desired outcome.

Practical Demonstration


Here is a Delphi demo application project containing the source code and a signed executable (download) using the popular ImageEn library that demonstrates these concepts in practice:


Here is the main Procedure that shows the LUMINANCE and LIGHTNESS of the clicked color:


procedure TForm1.ImageEnView1MouseDown(Sender: TObject; Button: TMouseButton; Shift: TShiftState; X, Y: Integer);

var

  BitmapX, BitmapY: Integer;

  ClickedColor: TColor;

  ClickedRGB: TRGB;

  R, G, B: Byte;

  Luminance, Lightness: Double;

begin

  // Convert view coordinates to bitmap coordinates:

  BitmapX := ImageEnView1.XScr2Bmp(X);

  BitmapY := ImageEnView1.YScr2Bmp(Y);


  // Check if the coordinates are within the bitmap bounds:

  if (BitmapX >= 0) and (BitmapX < ImageEnView1.IEBitmap.Width) and

     (BitmapY >= 0) and (BitmapY < ImageEnView1.IEBitmap.Height) then

  begin

    // Get the pixel color at the clicked coordinates:

    ClickedRGB := ImageEnView1.IEBitmap.Pixels[BitmapX, BitmapY];

    R := ClickedRGB.R;

    G := ClickedRGB.G;

    B := ClickedRGB.B;


    // Convert to TColor

    ClickedColor := RGB(R, G, B);


    // Calculate LUMINANCE:

    Luminance := 0.299 * R + 0.587 * G + 0.114 * B;


    // Calculate LIGHTNESS:

    Lightness := (MaxValue(R, G, B) + MinValue(R, G, B)) / 2;


    // Update the StringGrid with the new values:

    UpdateStringGrid(ClickedColor, R, G, B, Luminance, Lightness);


    // Set the Panel1 color to the clicked color:

    Panel1.Color := ClickedColor;

  end;

end;


How to Run a Silent Console Application in Delphi

 Author: PETER ASCHBACHER (PA-SOFT) Sometimes, it's necessary to hide the console window of a CONSOLE APPLICATION entirely to avoid dist...